In this week’s post, The Daring Librarian, Gwyneth A. Jones, shares her tips on how you can set up a makerspace at your library or school, for very little or no costs at all!
This post originally appeared on Gwyneth’s own blog. You can find the original article here: https://www.thedaringlibrarian.com/2019/04/makerspace-for-little-or-nothing.html
Makerspace for Little or Nothing
You don’t have to spend thousands of dollars to start a Makerspace area. You don’t have to have a designated room or rip out bookcases. You can even have a Makerspace on a cart! When we have testing in our Library, I put all our Makerspace stuff on an AV cart and roll it into our server room. This post evolved from a previous post called Makerspace Starter Kit Updated where I had some of these idea, but I felt that it deserved its own expanded post.
You can take baby steps into the Maker Movement. I’ve been saying that for 7 years or so, long before I blogged about it, I tried it out. Yeah, sometimes I try things on the sly to see if they are blogworthy for you! Now, having said that…
Check out how Princh works! With our interactive guides you can experience our products, that require no apps or user accounts to use. Experience our products here.
Controversial Opinion Ahead
I’m not 100% sold, even after 7 years of talking about the Maker Movement, that it’s something that’s here to stay and not just a fad. Even though I’ve (without knowing it!) been using aspects of the movement since we opened our school in 1997, what if it’s a flash in the pan? Back then we used Hollywood High, Specular Logo Motion, Hyper Studio, and we created a daily LIVE TV Studio news show. We didn’t know it was a Makerspace.
But what if we spend thousands of dollars on 3D printers, robotics, and other ephemera and it just ends up collecting dust? What if we DO make huge architectural changes in our schools and we can’t go back? What if it’s like the $10,000 interactive SMART boards in schools that are now just used as regular white boards? That’s why I’ve intentionally NOT spent a lot of money on our Maker corner. This post is about creating a Makerspace with little or no money. Using creativity instead of cash.
A Makerspace is what you make of it! Big or small, lavish or little, it’s all about the maker mindset. Be creative! Be crafty! Ask your kids what they want and brainstorm how to bring it to the school! Ask for donations. Ask for help. Don’t worry if it’s not perfect at first or if you fail. Just give it a shot.
TP & Paper Towel Building Blocks
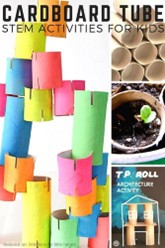
Collect toilet and paper towel rolls, heck – have the whole school collect them! Say you’re trying for 50 or 100 – put a decorated cardboard box outside your Library or Classroom for donations!
Make sure to Tweet, IG out, or add the request to your staff & community newsletter! But be careful, you could get an AVALANCHE of materials!
Then cut them into different lengths, have the kiddos paint them with water-based paints and notch them with scissors — then let kids build with them! Store them in milk crates or bins. Voila!
I’ve heard lately, that some people don’t like this idea because they’re concerned about germs. I guess TP rolls & airborne germs? I’m kind of a germophobe, and I didn’t even think about that! Sheesh. How about lightly spraying all the cardboard rolls with Lysol? Or how about using paper towel rolls cut into different lengths? More! Cardboard Tube STEM Activities and more!
Origami
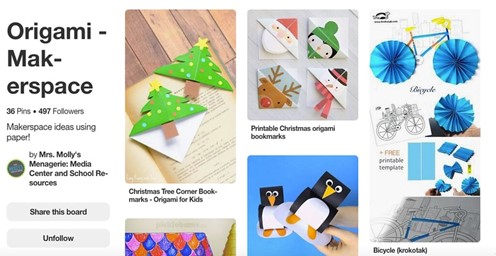
Origami is the perfect addition to a Maker program. Gather some origami books (I have like at least 10) paper of all kinds, safety scissors, rulers, and a recycling bin or the scraps and Voila! Kids love folding paper and even though I’m not patient enough to do this myself, many of my kiddos are amazing at Origami!
Great introductory Origami Projects:
- 3D Origamifor Beginngers
- Intro to Hexaflexagons (Templates)
- Origami Alphabet
- Origami Crane
- Simple Paper Folding for Young Children
- Hyperbolic Paraboloid
From: Paper Folding/Origami – MIT Edgerton Center – K12 Makerspaces
Legos for Nothing
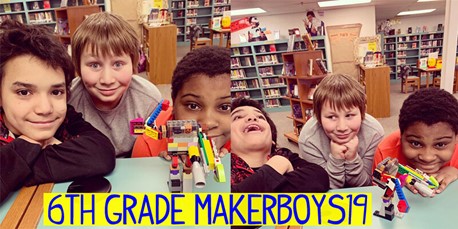
My lovely wonderful Library Media assistant Kathi, took Legos donated by the kids home over the weekend and put them all in a bucket with a bleach solution & dried them in the sunshine. Voila! Just like new!
Ask your PTA, ask your kids, have a LEGO donation bucket by the door of your Library Media Center or classroom and check out yard sales and thrift shops. Bleach is amazing and cheap. Go for it!
Now… I’ve totally snagged (with permission!) some amazing ideas from MY Makerspace Guru, Diana Rendina!
Cardboard Creature Challenge
Now, shamelessly stolen from my Makerspace Guru, Diana Rendina – Teasing Excerpts from the amazing article she wrote for Demco titled 3 Design Challenges for the Low-tech Makerspace.
“The Cardboard Challenge has long been one of my favorite makerspace activities. Inspired by the amazing short film Caine’s Arcade and the Imagination Foundation’s Global Cardboard Challenge (October 6th – Join in!), I create a new variation on this challenge every year. We’ve created cardboard arcades, robots, buildings, etc.” — Read the article for more!
Tech Take-Apart Robot Challenge
Tech take-apart is a classic makerspace activity. This design challenge takes it a step further by recycling the technology into a robot made by students. This project doesn’t have to be super complex — picture a shoebox painted with black paint that has keyboard keys and circuit boards glued to it.
Recycled Book Art Gallery
Our Art Teacher does this and we always love to provide gallery and brainstorming space! Maybe she gets some of our weeded books OR maybe she uses donated books from the kids and the community. I can’t speak to that here… my supervisor might see this!

Here’s what Diana has to say about this:
“We all have damaged our out-of-date books that we’ve weeded from our library. Instead of tossing them out, why not transform them into recycled art? Browse Pinterest or check out some of the recommended resources below to gather inspiration for students. Provide students with a variety of arts and crafts supplies, including glue, tape, paint, scissors, glitter, etc. Teach the students about what an artist’s statement is, and have them write one up once their project is done. Then create a gallery of all the students’ projects in the library and invite classes to visit for a gallery walk. This is a great way to introduce students to the world of professional art and a fantastic way to recognize their work. Design prompt: Working alone or in pairs, transform a used book into a work of art. You can use any arts and crafts materials, including paint, scissors, glue, tape, etc. Write an artist’s statement explaining how you came up with your idea and how you created your art. You will have one week to complete the project. All of the book art will be displayed with artists’ statements in a gallery in the library.”
Diana is amazing, she makes my Makerspace look like small potatoes or tater tots! I admire all she does and in a perfect world, I would totally adapt more of her ideas and projects. BEHOLD and admire!
More from Diana Rendina:
- How to Start a Makerspace When You’re Broke
- Starting a Makerspace: Baby steps
- 3 Design Challenges for the Low-tech Makerspace
- 5 Questions to ask when planning a Makerspace
Or just search her blog for all her posts on the Maker Movement, buy her books, and be sure to follow her on Twitter! Diana Rendina (@DianaLRendina) she’s kind of amazing.
Don’t forget that video production, animation, green screen, blue screen, TV studio, coding, programming, any collaborating with a Science class can make your school Makerspace program shine! Make sure to bring in other subject areas. Don’t just have a Maker program in the Library, have the Maker mindset all over the school. Work with your Tech Ed teacher, FACS (what was once called Home Economics) and Art teacher. Make your Library a great space to display artwork. I’m a big advocate of STEAM rather than STEM. Think about gallery openings and gallery walks. This gets more people into your space.
Consider creating short videos on Instagram or YouTube having kids talk about their artwork & create a QR code to that post that you print out and put next to the artwork. That way, when people see the display, they can scan and see the video.
Do NOT let the expense, mess, trouble, or obstacles stop you from doing this! Be the innovator and the spark in your school or district. You got this! I know you can be AWESOME!
Honestly, this last part was in a previous blog called Makersapce Starter Kit Updated but in case you missed it, I think this part is an important part of the conversation for any Maker project.
Author details:
Gwyneth A. Jones – The Daring Librarian
Global Ed Tech leader and Social Media consultant. Enthusiastic builder of brand evangelism, community involvement, and zealous engagement.
After 30 years of being a Teacher Librarian, Gwyneth has taken an early retirement to lend her expertise, Social Media following, and Ed Tech know-how as a Global Educational consultant and speaker.
Contact:
If you should ever need to contact me with questions or fabulous invites, you can find me on:
Email: gwynethanne@gmail.com
This article originally appeared on Gwyneth’s blog, you can find the post here: https://www.thedaringlibrarian.com/2019/04/makerspace-for-little-or-nothing.html
Recent posts
Green Libraries: How Sustainable Design is Shaping the Future of Public Libraries
In this week's Princh Library Blog post, recurring guest writer Sam L. Bowman discusses an ever so important topic: sustainable design and [...]
Librarians Supporting Digital Literacy in the Community
In this week's Princh Library Blog, Nina Grant covers why digital literacy is important, the variety of ways in which librarians are supporting [...]



Leave A Comment